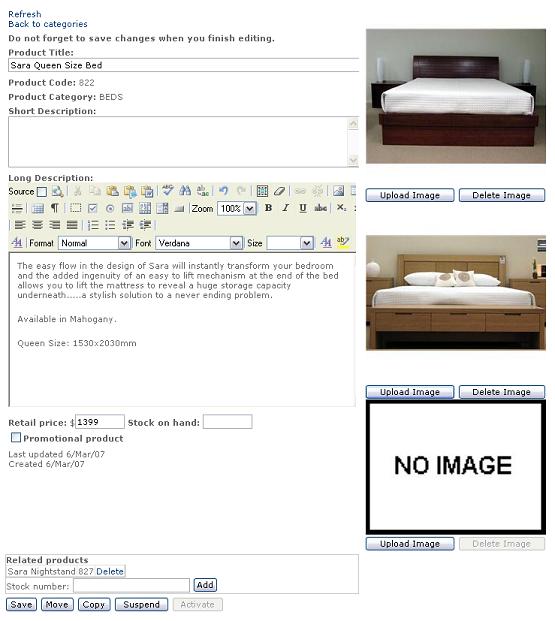
WMS Content Editor
Figure 1.1 shows the Kook Multimedia WMS Content Editor. This is where all adding and editing of text will occur. It is a simple interface similar to Microsoft Word. This tutorial is designed to explain some of the more advanced features of the Content Editor.
Adding an image
Clicking the button illustrated by Figure 2.1 will open the 'Image' window (Figure 2.2). From this window you can change all the properties for the currently selected image or alternatively insert a new one if no image was selected.
The 'Current image path' is the location of the image on the web server. This can be changed by manually typing in the location or alternatively browsing to the location and selecting the file. Browsing to the file will eliminate any chance of human error and will also verify that the image is there.
If the image is already on the web server then click the 'Browse Sever' button. (Figure 2.3) This will bring up the window 'Image Browser', pictured in Figure 2.4. This window allows you to view each image currently on the server. When you have found the image you want, click the 'OK' button. This will take you back to the Image Window. You will now see the image you have selected in the preview box.
If the image is one that you have not used before and is located on your computer then use the upload image box. This location may also be entered manually or by browsing. To browse click the 'Browse...' button. From here navigate through the folders and select the image you wish to use. Click the 'Open' button. If this is the image you want, click the 'Upload' button.
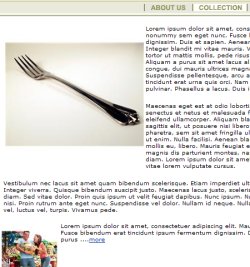
The image description is very important. Search engines use image descriptions to determine the relevance of an image. If you enter a good description of the image, search engines will give your page a better ranking. Be sure to add one. The description is also the same text that will appear when you hover your mouse over the image. These description tags are also used to help blind people to use the Internet. Special browsers designed for the blind will announce the text and image description on a web page. The height and width of the image can be changed by inserting the desired value in the respective boxes. This value is measured in pixels. If the ratio lock box is ticked, then changing one value will change the other to match the image ratio. This means that the image will not be stretched creating an unwanted effect on the image. Click the 'Reset Size' button to change the image back to its original size. The border property creates a border of the specified width the entire way around the image. The width is measured in pixels. The effect of the border property is depicted in Figure 2.6.
'VSpace' and 'HSpace' are short for Vertical Space and Horizontal Space, respectively. This is how close any other element can get to the image. It creates a 'bubble' around the image that no other object can venture into. The effects of VSpace and HSpace are depicted in Figure 2.7.
The align property tells the Internet browser where to position the image on the page. Luckily there is sample text wrapped around the image so that you can see the effects the align property has on the text as well. The best thing you can do is experiment with the different alignment options until you find the effect you desire.
Inserting a hyperlink
A hyperlink is what you click on to go to another page. It can be on either text or an image. The first step is to select the text or image that you wish to make into a hyperlink. Next click the button highlighted in Figure 3.1. This will bring up the 'Add Link' window (Figure 3.2).
There are four different options for a link and these are set in target window. It can link to a website, email, an existing file or a file on your computer that you wish to upload. For the first two options you use the top input box. Into this box you can insert the web address of a website you wish to link to. Alternatively you may insert mailto: followed by an email address, to create a link that will open the users default email program and insert the email address into the 'to' box. When creating these mailto: links it is always a good idea to make the link the actual email address that you wish to send the email to. (eg. mailto:test@server.com should be inserted on the text test@server.com) Doing this makes it easier for users of http mail services (eg. Hotmail or Yahoo). The WMS will automatically convert any email addresses entered, into a mailto: link. Therefore you should rarely use the mailto: in the link window. The second section of the page is used to link to existing files or upload a file to the server to link to. If the file is not already on the server and is on your computer click the 'Browse' button, navigate to the file you wish to upload and click 'Open'. When you are back to the link window, click 'Upload'.
Figure 3.3 shows the window that will appear when you click the 'Link Existing File' button. This is the button that you click if you have uploaded the file previously (i.e. this button will show you all files already on the server). Click the one you want to link to. Once you have determined which file or email the hyperlink is to link to you must select the Target. This is where the file linked to is going to appear. Use the <not set> option for any link except those that are links to an external site or .doc or .pdf files. In this case use the New Window (_blank) option. Giving the link a description will archive the same as the image description and is highly recommended. When you set all the properties for the image, click 'OK'.
Adding 'Anchor' links'Anchor' links allow you to make links to a particular part of a page. For example: if you have a large piece of content you may put the headings you are talking about at the top of the page and have links that allow the user to jump down the page to the topic they are interested in. These links within a page are called Anchor links. To create an Anchor link first highlight the text that you want to make a link at the top of the page and click the 'Insert/Edit Link' button. Instead of typing the web address as usual simply type a hash ('#') and then the link name; eg: #linkname. Then go down the page an click in the content where you want the user to jump to when they click the link at the top of the page. Now click the 'link' button in the toolbar and select the 'achor' type in the link name.
|
||||||||||||||||||||||||||||||||||||||||||||||||||||||||||||||||||||||||||||||||||||||||||||||||||||||||


WMS Content Editor
Figure 1.1 shows the Kook Multimedia WMS Content Editor. This is where all adding and editing of text will occur. It is a simple interface similar to Microsoft Word. This tutorial is designed to explain some of the more advanced features of the Content Editor.
Adding an image
Clicking the button illustrated by Figure 2.1 will open the 'Image' window (Figure 2.2). From this window you can change all the properties for the currently selected image or alternatively insert a new one if no image was selected.
The 'Current image path' is the location of the image on the web server. This can be changed by manually typing in the location or alternatively browsing to the location and selecting the file. Browsing to the file will eliminate any chance of human error and will also verify that the image is there.
If the image is already on the web server then click the 'Browse Sever' button. (Figure 2.3) This will bring up the window 'Image Browser', pictured in Figure 2.4. This window allows you to view each image currently on the server. When you have found the image you want, click the 'OK' button. This will take you back to the Image Window. You will now see the image you have selected in the preview box.
If the image is one that you have not used before and is located on your computer then use the upload image box. This location may also be entered manually or by browsing. To browse click the 'Browse...' button. From here navigate through the folders and select the image you wish to use. Click the 'Open' button. If this is the image you want, click the 'Upload' button.
The image description is very important. Search engines use image descriptions to determine the relevance of an image. If you enter a good description of the image, search engines will give your page a better ranking. Be sure to add one. The description is also the same text that will appear when you hover your mouse over the image. These description tags are also used to help blind people to use the Internet. Special browsers designed for the blind will announce the text and image description on a web page. The height and width of the image can be changed by inserting the desired value in the respective boxes. This value is measured in pixels. If the ratio lock box is ticked, then changing one value will change the other to match the image ratio. This means that the image will not be stretched creating an unwanted effect on the image. Click the 'Reset Size' button to change the image back to its original size. The border property creates a border of the specified width the entire way around the image. The width is measured in pixels. The effect of the border property is depicted in Figure 2.6.
'VSpace' and 'HSpace' are short for Vertical Space and Horizontal Space, respectively. This is how close any other element can get to the image. It creates a 'bubble' around the image that no other object can venture into. The effects of VSpace and HSpace are depicted in Figure 2.7.
The align property tells the Internet browser where to position the image on the page. Luckily there is sample text wrapped around the image so that you can see the effects the align property has on the text as well. The best thing you can do is experiment with the different alignment options until you find the effect you desire.
Inserting a hyperlink
A hyperlink is what you click on to go to another page. It can be on either text or an image. The first step is to select the text or image that you wish to make into a hyperlink. Next click the button highlighted in Figure 3.1. This will bring up the 'Add Link' window (Figure 3.2).
There are four different options for a link and these are set in target window. It can link to a website, email, an existing file or a file on your computer that you wish to upload. For the first two options you use the top input box. Into this box you can insert the web address of a website you wish to link to. Alternatively you may insert mailto: followed by an email address, to create a link that will open the users default email program and insert the email address into the 'to' box. When creating these mailto: links it is always a good idea to make the link the actual email address that you wish to send the email to. (eg. mailto:test@server.com should be inserted on the text test@server.com) Doing this makes it easier for users of http mail services (eg. Hotmail or Yahoo). The WMS will automatically convert any email addresses entered, into a mailto: link. Therefore you should rarely use the mailto: in the link window. The second section of the page is used to link to existing files or upload a file to the server to link to. If the file is not already on the server and is on your computer click the 'Browse' button, navigate to the file you wish to upload and click 'Open'. When you are back to the link window, click 'Upload'.
Figure 3.3 shows the window that will appear when you click the 'Link Existing File' button. This is the button that you click if you have uploaded the file previously (i.e. this button will show you all files already on the server). Click the one you want to link to. Once you have determined which file or email the hyperlink is to link to you must select the Target. This is where the file linked to is going to appear. Use the <not set> option for any link except those that are links to an external site or .doc or .pdf files. In this case use the New Window (_blank) option. Giving the link a description will archive the same as the image description and is highly recommended. When you set all the properties for the image, click 'OK'.
Adding 'Anchor' links'Anchor' links allow you to make links to a particular part of a page. For example: if you have a large piece of content you may put the headings you are talking about at the top of the page and have links that allow the user to jump down the page to the topic they are interested in. These links within a page are called Anchor links. To create an Anchor link first highlight the text that you want to make a link at the top of the page and click the 'Insert/Edit Link' button. Instead of typing the web address as usual simply type a hash ('#') and then the link name; eg: #linkname. Then go down the page an click in the content where you want the user to jump to when they click the link at the top of the page. Now click the 'link' button in the toolbar and select the 'achor' type in the link name.
|
||||||||||||||||||||||||||||||||||||||||||||||||||||||||||||||||||||||||||||||||||||||||||||||||||||||||||||||||||||||||||||||||||||||||||||||||||